Timesheets, task and time entries
Office Timesheets includes numerous interface options for tracking employee time, including daily, weekly, bi-weekly, semi-monthly, monthly, time clock and list views.Best of all, your organisation gets to decides how to tailor and present these options to each of your employees, giving them only what they need to easily,quickly and accurately enter and submit their timesheet for approval.
Office Timesheets is a project-oriented time and expense tracking solution. You, or your employees, simply create tasks – which is quick and easy to do accurately, needing just a few clicks or a template – then record time and/or expenses (covered on a separate page) plus notes and statuses, to each task.
Being able to quickly and easily custom-tailor Office Timesheets to your organization’s terminology and established business practices is what sets Office Timesheets apart from the competition.In fact, in most cases, a short and sweet email is all that an employee will need to login, enter a timesheets and submit it for approval.
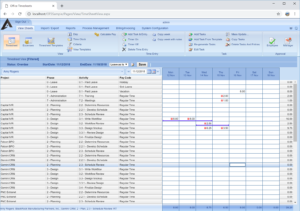
Office Timesheets Timesheet View
You can manage Tasks easily in Office Timesheets. As an administrator you define the rules that create them, set start and due dates, set security controls to determine who can do what within them, apply locks to statuses and date changes, set rates and hours and have the option to create templates which users can copy from to save even more time.
Recording a time entry is often as simple as clicking once on the day and task, then entering the time spent. Time entries record duration and can have start/stop times.
More information on expense entries
![]()
For more information and sample screens, please read on…
Tasks
Creating Tasks with Element Levels
As an administrator, you create tasks in Office Timesheets using up to 10 element levels you define yourself, as well as the requisite employee element. You can customise these element levels so that they are specific to the purpose of the time (and expense) sheets for your organisation – e.g.:
- client
- project
- phase
- activity
- cost centre
- department
- and so on…
You create tasks by combining element levels. Behind each element level are element items – e.g. behind the client element level would be a list of your organisation’s clients; the project element level would reveal a list of your organisation’s projects.
You can add more information for element items in custom fields – e.g. in the client element level, you can add details like address, contact number, email in fields within each individual client element item.
When you create a new task for a project, you specify the items under your customised element levels that apply – e.g. the employee, and perhaps some of the client, the project, the phase, the activity and the cost centre. Typically, some of these elements will be set automatically by task rules and dependencies, limiting the selections for any task to two or three elements. So, for instance, if you selected the client, your selection for projects could be restricted to that client’s projects.
Once you have created a task, it is visible under both timesheet and expense sheet views.
Adding Notes to Tasks
Within Office Timesheets you can add notes that apply just to that certain task – e.g. ‘On hold till 12 December’, ‘Call Bob for further details’.
You can tell when a note is attached to a task because a small red square appears beside the task in the time or expense view.

Setting Start and Due Dates
You can set task start and due dates in Office Timesheets, which gives you more control over your project management.
Setting Rates and Hours
You can set task rates, which are custom fields that help you with billing, budgeting and project costing. As an administrator you can pre-determine task rates or set them task by task.

Adding Statuses
Office Timesheets allows you to apply customised statuses to tasks – users update these using checkboxes when adding or editing a task. Task status fields might include:
- Complete
- Billable
- On Hold
- Cancelled
- and so on…
As an administrator you can also lock a task and its entries once the task has been marked to a specific status, such as ‘Cancelled’. This prevents users from adding to, editing or deleting the task or its time/expense entries – which means you can control your accounting and security.

Setting Rules and Dependencies
As an administrator you can use task rules to set the order of element levels – i.e. the order the element levels appear in when the task entry dialogue box appears.
You can also set dependencies to control what appears in the element level fields – e.g. if a certain project depends on a particular client, then what element items are available in the project element level depends on which client name is first selected in the client element level.
You can set the “required” status of element levels too – so that an element item must be selected within an element level in order to create the task. You can set all of these features to suit your organisation.
Time Entries
Once you’ve set up your tasks you can go about entering your time information. You can do this in several ways within Office Timesheets:
- by opening the time entry dialogue box;
- by typing directly into a cell;
- by starting and stopping the timer.
And once you’ve made you time entries, you can report on them, for project costing, client profitability, to support billing and much more.
Recording Time Spent
All time spent on any task has to can be accounted for – for billing, accounting, payroll and other needs.. In Office Timesheets you can specify exact start and stop times – which automatically calculates the time spent – or you can simply enter the time spent manually.
Your company policy and/or regulatory compliance requirements might mean that employees have to track their exact hours, accounting for all their workday time. Or you might be in a more relaxed environment where employees need to log only their time spent.
As an administrator you can force employees to enter either time spent or exact hours by setting their security policy accordingly – or you can leave it up to the employees to decide.
You can set the format for time entries to either hours/minutes or decimal.
Adding Notes
You can add notes to time entries, just as you can with tasks – e.g. ‘Remember to add 30 minutes for work done at home’.
You can tell when a note is attached to a time entry because a small red square appears beside the time entry in the timesheet view.

Adding Statuses
Office Timesheets allows you to apply customised statuses to time entries – users update these using checkboxes when adding or editing a time entry. Example time entry status fields you might set as an administrator include:
- Billable
- General Overtime
- Shift 1 Overtime
- Shift 2 Overtime
- and more…
As an administrator you can also lock the time entries once a task has been marked to a specific status, such as ‘Cancelled’. This prevents users from adding to, editing or deleting time entries within a task – which means you can control your accounting and security.